Commissioning
Introduction
Great job on making it this far! This is the final stretch, everything is wired up and ready to go, it is now time to test and prepare for printing. In the commissioning process you will likely encounter a bunch of random Klipper errors, feel free to reach out on the Discord with any questions or for assistance. The Klipper (Or Kalico) docs will assist you a lot here too.
Time required: 2 to 3 hours
Powering it on
Before powering on, ensure all your connections are solid and that you have wired the terminals correctly on the power supply & mainboard. If all is good, simply plug your printer in and turn it on. You will likely hear your Biqu Microprobe do a self check upon power up and see some lights from the Pi & MCU, this is expected and is totally fine. Your Pi will take roughly 30-45 seconds to boot up and connect to your network.
Connect to the Pi
Since we installed Klipper and Mainsail earlier, we can just connect to the Pi by inputting its IP Address into your choice of web browser. If you do not know it’s IP address, go onto your routers Admin Panel, you can find a list of connected devices with their IP address on there. Typically Klipper devices start with 192.168.X.XXX. After you input the IP address, you will be met with the Mainsail web UI. If you want to customise this interface to your liking, check out the Mainsail Documentation.
Adding the configuration files
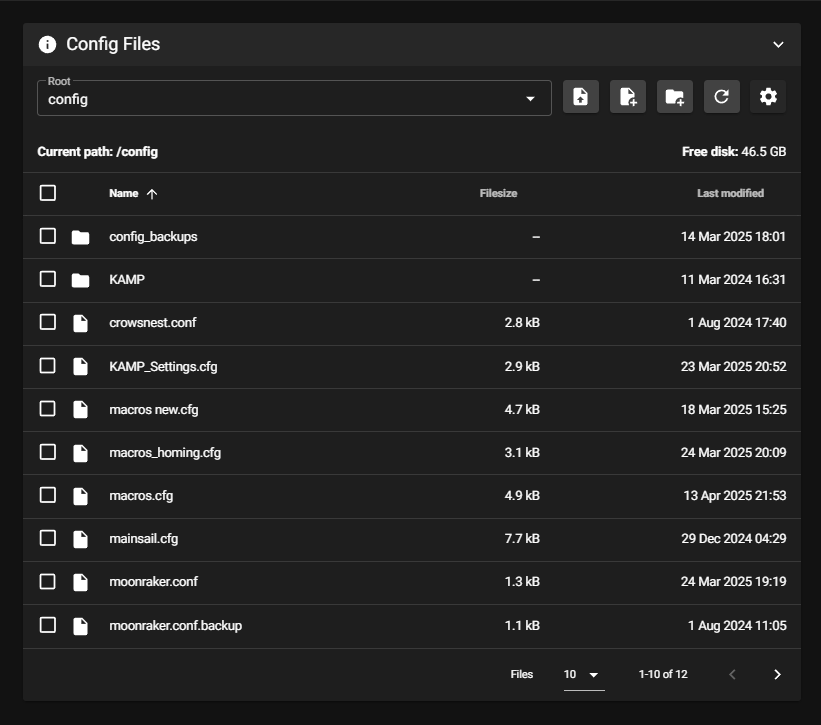
Now that we are connected to Mainsail, we need to add the correct files. You will need:
- printer.cfg
- macros.cfg
- (Optional) macros_homing.cfg
These files can be found on the GitHub page, simply download them (Your browser might say that this is a virus, it’s common with .cfg files) and then drag and drop into the Machine tab here:
Updating the configuration files
If klippy refuses to connect, we need to SSH into the Pi. There are many SSH applications out there, Mac OS even has it built in. I use PuTTY but you can use whatever you like. Connect to your Pi by inputting its username and password. From there run the following commands:
cd ~/klipper/
ls /dev/serial/by-id/
You should see the serial ID for your mainboard here, it will look like this:
usb-Klipper_stm32g0b1xx_XXXXXXXXXXXXXXXXXXXXXXXX-if00
This is good, copy this value and paste it in printer.cfg so that it looks like this:
[mcu]
serial: /dev/serial/by-id/usb-Klipper_stm32g0b1xx_XXXXXXXXXXXXXXXXXXXXXXXX-if00
Safety Checks
These steps MUST be followed before using the printer, you risk damage to your nozzle if you do not configure the probe correctly, and possible issues with thermal runaway if you ignored the wiring diagrams requirements.
Safety Checks - Motors
So, at this point you should see your printer in an idle state. You may be getting immediate error outs like ADC out of range (Thermistor issue, refer to wiring if this is the case). If not, congratulations! We are getting closer and closer.
Begin by checking your motors, there is this handy command called STEPPER_BUZZ. Run the following 4 commands:
STEPPER_BUZZ STEPPER=stepper_x
STEPPER_BUZZ STEPPER=stepper_y
STEPPER_BUZZ STEPPER=stepper_z
STEPPER_BUZZ STEPPER=extruder
Every motor should do a slight movement for 10-15 seconds, it may be very quiet so just carefully look at the pulleys on your motors and the yellow extruder motor gear that is visible on the left side of the toolhead. If all moves, we can proceed to doing safety checks
Safety Checks - Microprobe
The Biqu Microprobe has some macros that you can use to test deploying and retracting, but these only do so much. On your Mainsail front page, use the PROBE_DEPLOY macro, the probe should deploy. After this, run QUERY_PROBE in your console, it should say “open”. If it says “triggered” we need to reconfigure the [probe] section in your printer.cfg.
If it states “open”, manually push the probe in with your finger and then re-run QUERY_PROBE. If it states “triggered”, good job! Your probe is ready and good to go. You should now run PROBE_DEPLOY and PROBE_STOW to reset the microprobe as sometimes it may get stuck in a “triggered” state if you push it in yourself.
If it states “triggered” when you used PROBE_DEPLOY, there is a configuration issue. This is usually fixed by going to the [probe] section in printer.cfg, and setting pin: ^!PC13 to ^PC13. Once changed, repeat the above steps and it should be fixed, if not please contact me on Discord as you may have a defective unit.
Safety Checks - Homing
Typical 3D Printer setups have you home at the right, then the rear. But on the P1S, it homes at the right then to the front, which will be the coordinates X256, Y0. Before we home, we need to first configure sensorless homing. We will start with a value way too sensitive and work our way down from there until we get a successful home. Don’t worry too much about homing direction right now (unless it tries to home to the left). I highly recommend that you keep your hand on the emergency stop button in the top right of mainsail to prevent crashes etc.
As stated by the Klipper & Kalico docs, TMC2209 has a sensitivity range of 0-255, where 255 is the most sensitive, and 0 is the least sensitive. TMC2130, TMC5160, and TMC2660 has a sensitivity range of -64 to 63, where -64 is the most sensitive and 63 is the least sensitive (Yes, opposite to 2209’s, - is more sensitive).
I highly recommend you follow the Klipper Docs for configuring sensorless homing, it covers all the commands you need to use. Place the toolhead at the center, change your sensitivity with the correct command, please use G28 X, G28 Y or G28 X Y when homing, we will do Z homing last.
If your printer homes to the right, then to the rear, you need to swap the motor cables around on the mainboard. This should result in a correct home, if your printer homes to the left, then to the rear, add/remove a ! before the dir pins in printer.cfg under [stepper_x] & [stepper_y] and use G28 X Y to home just X and Y.
All good? We can move onto homing Z. Make sure after homing X & Y you set the toolhead to be at the center of the bed, this can be done by sending this command in console G1 X128 Y128 F5000. I highly recommend that you manually move the Z axis to roughly the middle as it may home in the wrong direction. Use the emergency stop button in the top right if this is the case. I purposefully set the Z homing speed to be really slow in printer.cfg for you to do a safety check. Once ready, send the command G28 Z, it should deploy your probe and then begin homing the Z axis. If it starts moving towards the nozzle, manually push the probe in with your finger, if the bed stops, retracts then homes a second time you are good to go. If the bed completely ignores your probe triggering, IMMEDIATELY hit the emergency stop button orelse your bed will crash into your nozzle.
If the probe triggers, run G28 Z again, this time watching carefully as the bed moves towards the probe, keeping hands on emergency stop incase your probe is too high or too low. If it hits the probe, retracts, homes again then congrats, you just fully homed your printer!
If the probe does not trigger, please refer to Safety Checks - Microprobe, or contact me on Discord.
Safety Checks - Hotend
This section covers the heating of the hotend, we have not run a PID tune just yet so your heater will be very erratic. Please double check that you have wired the hotend up correctly with the thermistor in the correct spot, or you risk possible thermal runaway.
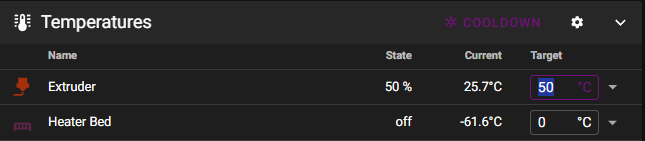
Ready to proceed? You can set the heater temperature to 50°C as shown, your 2510 fan should now automatically kick in, if you don’t hear the fan turning on we will need to address that in the next step.
If your hotend is heating up correctly, we can move onto the heatbed.
Safety Checks - Heatbed
This section covers the heating of the heatbed, the bed is AC powered, so please ensure you have wired the SSR up correctly as shown in the wiring diagram.
Ready to proceed? You can set the heatbed temperature to 50°C as shown. It should start rising in temp relatively quickly, if this is happening then you are good to go with PID tuning later on.
Safety Checks - Fans
To test the 5015 part cooling fan, you can use this tab here in Mainsail to enable and disable the fan.

The fan should start spinning immediately, if you hear an audible buzzing and the fan is not turning, you have wired the fan incorrectly or there is something stuck in the blades. Make sure the blades are clear of debris and not contacting any surface, and if your wiring is incorrect just flip the cables around and try again.
Your 2510 Delta fan is not controllable (Unless defined as a regular fan). It will automatically kick in after your hotend reads above 50°C, since we covered the hotend tab previously, you can check that this works again by just heating your hotend up to 50°C.
Getting ready to print
Great job making it this far! Your printer now successfully homes and the probe works, your heaters are working, and your fans are all ramping up. These are the necessary parts to make a printer work, up next is going to be PID tuning your hotend & heatbed, Z offset calibration, loading filament and then sending a print!
PID Calibration
Hotend PID calibration should be done with the parts cooling fan at 100%, and must start with the hotend at ambient room temperature. You can enable your part cooling fan under the Miscellaneous tab. Once ready to go, run the following command below by sending it into Console:
PID_CALIBRATE HEATER=extruder TARGET=250
The hotend fan will kick in, and your heater will begin skyrocketing towards 250c, it will then disable itself once the temperature is reached, then repeat over and over. This does not take long on the hotend. Once it has finished, type SAVE_CONFIG into your console, your printer will reboot and the values should be saved automatically.]
Heatbed PID calibration is not as picky, but now might be a great time to grab some food and a coffee.. Start by simply running the following command below:
PID_CALIBRATE HEATER=heater_bed TARGET=70
This can take anywhere from 15 minutes upto 45 minutes, I know.. it is painful but necessary. Once it has finished, repeat the same command as the hotend, SAVE_CONFIG.
Z Offset Calibration
To begin with Z offset calibration, grab a piece of A4 paper and if you want, cut it down into a smaller piece. Home the printer then lower the Z axis down. Use some flush cutters to make sure your nozzle is clear of any and all debris, otherwise you can throw off the calibration. Position the toolhead central to the bed by sending G1 X100 Y143 F5000 into the console. Run the command:
PROBE_CALIBRATE
This will do 1 or 2 probes in the center of the bed, then move the nozzle to the position where it probed slowly. A menu will now pop up on mainsail, start slowly lowering your nozzle, avoid using the larger options as you may crash into the bed. Once you start to feel slight friction, lower down by another 0.025 and hit accept. Once done, send G1 Z10 and then SAVE_CONFIG. Once the printer has restarted, home again and then move back to the same position as your probe G1 X100 Y143 F5000. Start slowly lowering down to Z0, you should feel slight amounts of resistance once Z=0, if it is too much, raise your Z back up then re-run the calibration routine, if it is too high then don’t worry, we will live adjust in the first test print.
Bed Tramming & Bed Meshing
The default mesh_min and mesh_max values are defined for my custom fan cover, where the Biqu Microprobe is integrated neatly. If you are using a different probe mount, you will need to find it’s X Y offset and calibrate a new mesh_min value. You risk possible collision or nozzle dives if you do not calibrate this correctly.
If you are running the new fan cover and everything is stock, preheat your bed up to your ideal print temperature (60C for PLA, 100-110C for ABS) then go ahead and run BED_MESH_CALIBRATE. This will do a full mesh of the bed, watch it carefully to ensure that it does not go over the build plate, if it does immediately hit the EMERGENCY STOP button. Once complete, head over to the “Heightmap” tab, you will see a mesh of your bed. Ideally you want the range to be below 0.25mm, if it is higher than this we can start tramming the bed.
If your bed is above these values, and you are using the new fan cover, I have pre-configured SCREWS_TILT_CALCULATE, this command will probe the three screws underneath the bed and tell you how much to turn them in Minutes, Clockwise & Counter-Clockwise. Once you have adjusted, go through the process another 2-3 times until you get under 6 Minutes of rotation needed. Run BED_MESH_CALIBRATE once more to see how level your bed is, if it is still above 0.25mm and your bed is noticably warped, it’s likely that you will not get better results than this and will have to use foil tape or similar to level the bed yourself.
Input Shaping
If you purchased an accelerometer such as an ADXL345, go ahead and mount this as close as you can to the nozzle as possible, if you have a TZ AliExpress hotend or similar, you can directly screw an accelerometer to it with a V6 nozzle (The stock ones do not work). If not, I created some mounting holes for an accelerometer on the toolhead cover, it’s not ideal but it works for now.
Follow this link to configure your accelerometer on Klipper, once you have mounted the accelerometer and have followed all of the steps, run the following command:
TEST_RESONANCES AXIS=X
It will begin testing resonances on the X axis, this will be loud and it will violently shake the machine. You will know this since the P1 does it stock too. Once it has finished, SSH & FTP (FTP is to grab your graph once finished) into your Raspberry Pi then follow these:
cd
~/klipper/scripts/calibrate_shaper.py /tmp/resonances_x_*.csv -o /tmp/shaper_calibrate_x.png
Once the script has completed, it will auto generate a graph in the /tmp folder. Download this file using your FTP program of choice. Repeat the above steps for Y, replacing the commands with these:
TEST_RESONANCES AXIS=Y
~/klipper/scripts/calibrate_shaper.py /tmp/resonances_y_*.csv -o /tmp/shaper_calibrate_y.png
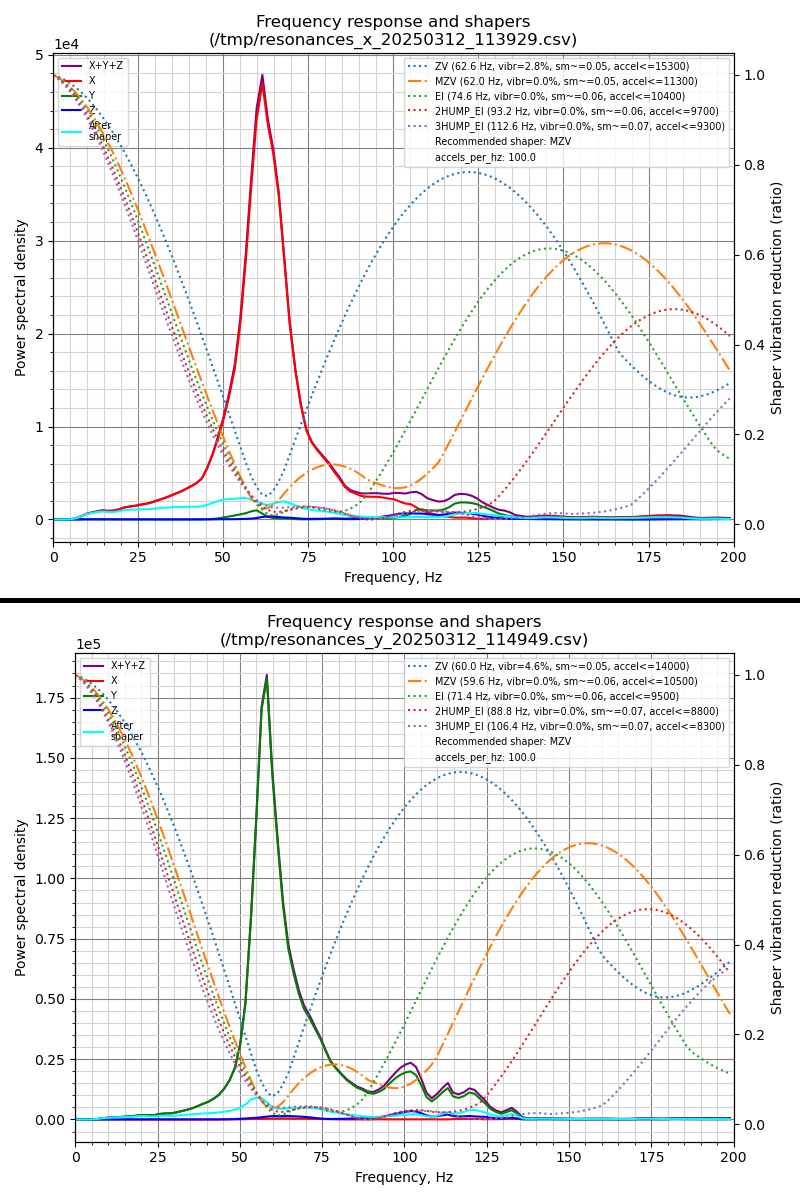
Once you have the graphs, take note of the recommended shaper, and it’s Hz value, we will need to put these values under the [input_shaper] section.
[input_shaper]
shaper_freq_x: 62.0 (example)
shaper_type_x: mzv (example)
shaper_freq_y: 59.6 (example)
shaper_type_y: mzv (example)
Here are my Input Shaper results, if yours have multiple peaks or looks like the Himalayas, please contact me on Discord as something might be wrong with your gantry.
Printing
Congrats! You have completed all of the necessary steps to start printing. So far we have:
- Performed a bunch of safety checks, ensuring the motors work, the probe works, the heaters work and the fans work
- PID tuned all of the heaters to ensure a stable and reliable working order
- Calibrated a Z_OFFSET for the nozzle so that we get perfect first layers
- Trammed the bed and performed a bed mesh to ensure the probe works
- Performed input shaping to counter resonances that can cause ringing and other artifacts in your prints
All that is now left is to go into your slicer of choice, slice up a model and print! I recommend taking a P1S profile and changing gcode flavour to Klipper, then replacing the start and end gcode with:
START_PRINT T_EXTRUDER=[nozzle_temperature_initial_layer] T_BED=[bed_temperature_initial_layer_single]
END_PRINT
Carefully watch the entire process start to finish, make sure it homes successfully, performs a bed mesh and purges a thicc line before a print starts. Since we use KAMP (Klipper Adaptive Meshing & Purging), it will only probe & purge where the model actually is. Start watching that first layer go down, you can actively tweak your Z_OFFSET here and save the value after it has printed. If you start having your nozzle scrape the bed, hit the EMERGENCY STOP button to prevent further damage, if that happens you need to re-run the probe_calibrate routine. Please also contact me on Discord if this happens so I can help you go through the process if necessary.
Admire your work!
That’s it! You have successfully converted your Bambu Lab P1 (Or X1 👀) to run on Klipper, you have done great! If you want to get your serial number, provide a video of it printing with your username on a sticky note to receive a serial no. next to your name! Thanks for taking your time to carefully read these docs and go through the conversion process, it took me a long long time to cook this up. This page will serve not only as a guide but also a wiki in the future with many FAQ available.
Take care, happy printing! 💜